Tuesday, March 20, 2018

Peeling the Banana

March 20, 2018 Posted by Akalanka , , 1 comment
The banana PI is a tiny powerhouse with its powerful STM32 microcontroller and integrated NB-IoT modem. In this post we will go bit more in depth to see what this tiny board has on offer. 

Power source

The STM32F103RBT6 controller in the Banana should be powered from a stable voltage source between 2.0V and 3.6V. You can supply power via

  • USB connector from PC or power bank
  • Vcc GND pins in SWD header up to 3.6V
  • Battery connector up to 3.6V

The recommended operating voltage should be adhered to as indicated in the datasheet to keep the little STM happy.


I/O Pins
There are 51 I/O pins available in the STM32 and many of them can be found in the 40 pin GPIO header in the Banana. It the very important to note that not all pins are 5V tolerant. As indicated in the table above, the input voltage for 5V tolerant pins should be less than 5.5V. and only 3.3V for non 5V tolerant pins. The voltage levels of the peripherals connected to the I/O pins should be carefully checked to avoid damaging the STM32. It is always advisable to use a logic level converter for converting 5V to 3.3V or use peripherals that run off 3.3V to avoid destroying the microcontroller.

The 40 pin header layout is as follows:


When programming in Arduino IDE the pin name (eg:PC1) can be directly used in pinMode(), digitalWrite() and digitalRead() functions.

USART ports

The Banana has 3 USART ports in addition to the virtual USART port (USART0) which is visible over the USB when connected to the PC.

  • USART0 - virtual COMM port visible only when connected to PC via USB
  • USART1 - 5V tolerant
  • USART2 - Not 5V tolerant, used for modem communication and should be used with external devices
  • USART3 - 5V tolerant
I2C ports

The Banana has 2 I2C modules where both are 5V tolerant


SPI ports

The Banana has 2 SPI modules where SPI1 is only 3.3V but SPI2 is 5V tolerant

Onboard LEDs

The Banana has 4 on board LEDs for status indication etc.
  • LED1 - PC0
  • LED2 - PC1
  • LED3 - PC2
  • LED4 - PC3
Reset button
This button is self explanatory since it pulls the RESET pin low to reset the microcontroller

Power button
This button, even though named as the power button on the board pulls down the PD2 pin on the microcontroller when pressed. It is up to you to use it as a trigger or a power key in the firmware.


Sunday, March 18, 2018

NB-IoT with Inzpire

March 18, 2018 Posted by Akalanka , , 2 comments

Maintaining communication with remote devices is always a challenge in IoT. Building a IoT solution is always a new exercise because the types of hardware and protocols keep getting updated periodically. A good example is the Constrained Application Protocol (CoAP) which rose to popularity with small devices coming into the picture in Internet of Things. Today we will see how Inzpire can minimize the hassle of connecting your NB-IoT device with your application server.

Why CoAP?
Not all protocols are made the same way. CoAP is a very lightweight protocol optimized for low bandwidth networks. Unlike our good old HTTP which has been a reliable workhorse for more than 90% of our digital interactions with a very verbose protocol, CoAP has a compact packet format based on a binary protocol. Being an application layer protocol it relies on UDP transport for end to end delivery. However since guaranteed delivery is not a thing for UDP, CoAP implements its own simple stop-and-wait type error recovery and congestion control mechanism. If you know about the more sophisticated features offered by TCP such as adaptive flow control, think of CoAP like its slow cousin. But CoAP thrives in a resource constrained environment both on the network and device ends which gives it an edge over TCP in most narrow band applications. In tests we have seen that when operating at the coverage edge with NB-IoT, CoAP request with a 10 byte payload takes less than 3 seconds while a simple HTTP GET request takes in excess of 30 seconds (Yes you saw that right, its 30s, crazy stuff happen when you push the poor modem to the limit). I was initially skeptical on the effectiveness of CoAP, but the results of the above experiment made me think otherwise.

Inzpire to the rescue
Using CoAP comes with its own set of cons. A major one being the lack of experience needed to setup and maintain a CoAP server for device communication. Inzpire NB-IoT solves this problem for you by acting as gateway to forward CoAP messaging to and from HTTP. If you are familiar with how SMS and Voice works in Inzpire you will notice many similarities.


In this article we will see how you can connect your Banana Pi with a BC95 NB-IoT modem to your application through Inzpire NB-IoT. For more info on Banana Pi and NB-IoT refer the previous posts in this blog.

Step 1: Setup an HTTP/MQTT endpoint for device to communicate

HTTP method

You should have a HTTP web server running at a public location for handling up link messages from the device. Once a call is received by your short code or long number an HTTP request will be made from the Inzpire voice server to this server. The URL of this service should be entered in the callback URL in the next step when provisioning a NB-IoT device. The request will be a HTTP POST with the following parameters in a JSON formatted payload in the body
  • deviceId: This is the IMEI of the NB-IoT modem
  • payload:
    • type: data type is Buffer by default
    • data: data payload sent by the device as an array
MQTT method

If you are opting for the MQTT integration, you should have a public MQTT broker for this step. You will receive a publish from the device to the topic that you will provide in the next step. If you are subscribed to that topic with your own favorite MQTT client, you will be able to receive the message.

Step 2: Provision your Banana Pi in Inzpire

Provisioning an NB-IoT device in Inzpire is made extremely simple with a single SMS. 
  • HTTP Method:
    • Send NBReg<Space><IMEI of your Banana PI><space><Callback URL> to 77001
  • MQTT Method:
    • Send NBReg<Space><IMEI of your Banana PI><space><MQTT Broker URL><space><MQTT topic> to 77001
  • You will get a USSD prompt indicating that you will be charged a subscription fee for the service
  • Enter S in the USSD prompt and hit send
  • You will receive an SMS with 'Device registered successfully' with a device key.
Step 3: Connect your Banana-Pi , fire up Arduino IDE and start coding

Once your device is registered, simply call the functions related to messaging via CDP in the BC95-Arduino library at https://gitlab.com/akalankadesilva/BC95-Arduino to send messages and receive messages. All the messages that the device sends will be sent as HTTP POST requests to your callback URL.


Using BC-95 for NB-IoT

March 18, 2018 Posted by Akalanka , 4 comments
The BC-95 modem by Quectel is a low cost NB-IoT modem designed to be used in low power applications. This has a chipset by Neul whose parent company is now Huawei. Main highlights of this modem are:

  • Supports NB-IoT in Band 5/8/20
  • Inbuilt stack for UDP, COAP*
  • Support for Non-IP data delivery
  • Downlink max speed: 24kbps
  • Uplink max speed: 15.625kbps
  • AT Command interface via UART
The offered AT commands are quite comprehensive yet simple. You can refer the official page http://www.quectel.com/product/bc95.htm for more details. Important commands to remember are:

Basic AT commands:
  • AT+CFUN - turn modem ON or OFF by setting the functionality
  • AT+NRB - reboot modem
Network registration
  • AT+COPS - set network registration. 
  • AT+CEREG - check network registration status and parameters
Data (PDP) activation & testing
  • AT+CGATT - Attach packet data
  • AT+CGDCONT - set APN
  • AT+NPING - Ping a remote IP address
UDP Datagram 
  • AT+NSOCR - Open UDP socket
  • AT+NSOST - Send UDP message
  • AT+NSORF - Receive UDP Packet
  • AT+NSOCL - Close UDP Socket
CDP (COAP) 
  • AT+NCDP - Set CDP platform settings
  • AT+NMGS - Send CoAP message via platform
  • AT+NNMI - Received message indicator
  • AT+NMGR - Get received messages

A sample command sequence would be 
  • AT+NRB - Start with a reboot 
  • AT+COPS? - Check if connected to network
  • AT+COPS=1,2,"41301",7 - Make the modem attache to network manually. "41301" are the MCC & MNC for Mobitel Sri Lanka
  • AT+CGATT=1 - Start data session
Once this is complete you can either send UDP messages or CoAP messages using appropriate commands. 

Important: If the modem you have at hand is not registering on a network check the following - 
  • Enter AT+NCONFIG?
  • Check if the 'scrambling' parameter is set to false. If not enter
    • AT+NCONFIG="CR_0354_0338_SCRAMBLING","FALSE" 
  • Enter AT+NUESTATS to check the current modem status in the radio layer.
  • You can set the 'auto connect' parameter in NCONFIG to true so that once the modem is powered up it will auto attach to the network.
This is caused by the different ways the operators configure their network. Prior to 3GPP release 13 (R13) scrambling could be turned on on the network as an option. But R13 mandated turning on scrambling which meant the scrambling status should be configured depending on your NB-IoT service provider. However even this minor ambiguity is expected to be ironed out when complete R13 compliance is reached.

Connecting your BC-95 to Arduino

If you are using Arduino and want to connect to your BC-95, you are in luck. We have a simple Arduino library for you to give the head start at https://gitlab.com/akalankadesilva/BC95-Arduino 

Refer the bc95test.ino in the GIT for sample codes to send UDP messages and CoAP messages to remote servers. In the next post we will see how to communicate with a BC-95 based device using Inzpire NB-IoT device API.


Go bananas with Banana Pi!

March 18, 2018 Posted by Akalanka , , No comments
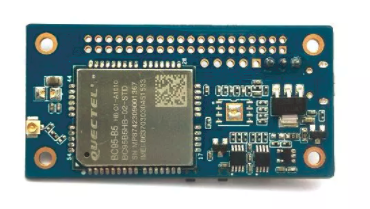
We went through the names of few NB-IoT modems currently available in the market in our last post. And then we laid our hands on this interesting piece of circuitry called the Banana Pi. If you are into the whole single board computer thing you might think its a raspberry pi knockoff. The initial banana pi is actually a single board computer similar to the raspberry pi and the orange pi (yes <fruit name> +pi is a naming convention for SBCs) with a ARMv7 processor running linux. Now Banana Pi is a popular brand in the industry and many different models with an array of ARM processors can be found. The banana pi we have  is not a single board computer, but a microcontroller board with a powerful STM32 series microcontroller. Turn it around and you will see a BC-95 NB-IoT modem in all its awesomeness.
To add to the excitement you will see that it has a 40 pin header for I/O pins and a battery terminal for directly connecting a 3.7V li-ion cell or couple of AA cells. All these are essential ingredients for a neat IoT device comes in a small 60mm x 30mm package.

In summary the Banana PI Linaro has
  • STM32F103R microcontroller running at 72MHz
  • 128kB program flash memory 
  • 20kB SRAM
  • 51 GPIOs
  • UART
  • I2C
  • SPI
  • PWM
  • BC95 NB-IoT Modem
  • 3.7V Li-Ion and 5V power input
  • 5 LEDs + 1 power LED
However the Banana Pi, with its STM32 microcontroller, poses few challenges to the developer unless you are familiar with IDEs like Keil and have access to a STLink programmer. If you are an Arduino fan and is now accustomed to the convenient way that things can get done with an Arduino, trying to learn programming the STM32 with Keil (which is an IDE for ARM based processors) might be intimidating. But the silver lining is that the good guys at Leaf Labs have an Arduino IDE compatible bootloader - Maple and the necessary IDE plugins - libmaple to get you up and running in no time. Let us see how you can setup the Banana Pi Linaro with your favourite Arduino IDE and Maple

Step 1: Install the Arduino board for STM32

In order to use your board with the Arduino IDE, the first step is to install the board definition.
  • Open your Arduino IDE. We tested this on 1.6.10
  • Go to Tools > Board > Board Manager
  • Search for 'Maple Mini' as shown below and install the STM32F1xx by stmduino board

When the board is installed, you will be able to see that there are few board definitions that are added as shown below.

Out of the newly installed boards, we are interested in the STM32F103R series, which is the tiny powerhouse we have in our Banana Pi. Like any other Arduino board you will also get the samples for the board under File >Examples >A_STM32_Examples


Step 2: Install Maple bootloader on microcontroller

If you are lucky enough to get your hands on a Banana Pi with Maple bootloader, you can skip this step. Else read on..
In order to flash a firmware to a microcontroller, usually you need a dedicated programmer for this task such as a PiCKit for PIC microcontrollers and AVR ISP for Atmel AVR microcontrollers. However an easier option is to use a bootloader. A bootloader is a small piece of code that runs for few seconds when the microcontroller is started to check for new firmware over Serial or USB and writes the new firmware to the program memory if available. Arduino has many different bootloaders available for AtMega 328, AtMega 2560 chips by Atmel such as Uno, nano, Mega, Diecimilia etc. in their boards. This makes it very convenient to program a microcontroller right from the IDE (such as Arduino) since it does not need a programmer hardware. All this time you have played with your Arduino, you have been using Atmel chips with Arduino bootloaders programmed via the Arduino IDE. A programmer is needed only to flash the bootloader, which needs to be done only once.

The STM32F103 microcontroller we have in our Banana Pi has its own method of firmware update using a special protocol called DFU. Device Firmware Update (DFU) is a standard protocol used to flash firmware updates to devices over USB. Most middle to high end microcontrollers have in built DFU for conducting firmware updates. The STM microcontroller in our Banana Pi has DFU and in built USB which enables it to flash firmware very easily. This is different to how things are done in an Arduino board with a ATMEL microcontroller where a USB-Serial bridge (FTDI232, PL2303 etc.) connects the host PC USB with the microcontroller USART0. This is because the ATMega 328 or ATMega 2560 microcontrollers in standard Arduino Uno, Nano or Mega boards (except the Leonardo) do not have in built USB ports. Therefore once you plug in the Banana Pi to the PC, it should be detected as a DFU device since DFU device drivers usually comes with any modern Windows OS. We will show how it can be done in Ubuntu in a later post. 

If what you read above sounded greek, fear not, as there is a easy way out. The maple bootloader enables you to use the STM just like an Arduino.To make an STM work with Arduino IDE with the board that we installed in the previous step, you should write the Maple bootloader to the STM which is a one time thing. You can find a good resource on how to install the Maple bootloader at Leaf Labs http://docs.leaflabs.com/docs.leaflabs.com/index.html You will need a STLink programmer for this process. Once the bootloader is flashed to the memory the DFU becomes active after a board reset for a short period for firmware update. If the IDE does not initiate a firmware update, the STM goes on to execute the program code. Now, the board will now be visible as a COM port in your PC just like an Arduino. 


Step 3: Setup Maple drivers on PC

Remember how we said that the board will be recognized as a DFU device by Windows? Most of the time you will need to introduce the drivers to the device in order to be recognized successfully. This is done using a simple tool called 'wdi-simple'. Refer this video https://www.youtube.com/watch?v=0jdJp3TQuJY for step by step instructions and this great github link https://github.com/rogerclarkmelbourne/Arduino_STM32/wiki/Maple-drivers for more info. Once the drivers are introduced properly, your Banana Pi will be fully functional for firmware update as well as Serial communication just like a our plain old Arduino Uno.


How to connect with NB-IoT

March 18, 2018 Posted by Akalanka , 2 comments

Like any wireless or wired network, NB-IoT requires a modem with NB-IoT capability to reach the network. However unlike a WiFi or Bluetooth modem, NB-IoT requires a SIM card and subscription to a NB-IoT enabled network operator as well. In that it is more similar to an ordinary mobile service subscription. Mobitel, Sri Lanka's national mobile service provider is currently deploying NB-IoT around the island and if you are in Sri Lanka you can contact them to get pointers on how to connect your NB-IoT device.

NB-IoT modem saga

The standardization of NB-IoT was completed by 3GPP (the guys who tell whos who and whats what in telco standardization domain) in mid 2016. Since then we have seen multiple chipset manufacturers hopping on the bandwagon to build NB-IoT enabled chipsets. The first NB-IoT chipset was built by a UK based company Neul which is now acquired by Huawei. Their chipset was later used by popular modem manufacturers like Swiss based u-Blox and China based Quectel. u-Blox introduced the Sara N200,N210 series while Quectel came up with the BC-95. Another giant in the chipset arena, Qualcomm was quick to embark on its own NB-IoT journey with their MDM9206. This chipset is adopted by another very famous name in the modem business, SIMCom in their SIM7000 modem series. Sequans communcations, also a popular brand in modem business has their own single chip modem called the Monarch series. Another Chinese telco equipment giant, ZTE is also in the modem market with their Welink ME3612.

In summary, at the time of writing, we have the following modems for NB-IoT

  • BC 95 by Quectel
  • BG 96 by Quectel
  • SIM7000 by SIMCom
  • N200/210 by u-Blox
  • Monarch N by Sequans
  • ME3612 by ZTE

Each modem comes with its own quirks and features. Some are more developer friendly than others. An important factor to consider is the amount of resources that are available. Large chinese firms such as Huawei are aggressively driving NB-IoT in network side, platform side and device side which means there are more resources than you think if you are willing to learn chinese (I'm kidding the good guys at Google have given us the translator for free) and search in Baidu (yes its their own search engine).
For the interest of our local readers we will go through the most popular modems like N200, BC95 and SIM7000 in our following posts anything else we can get our our hands on. Till then keep hacking!

Kickstart your next IoT project with NB-IoT

March 18, 2018 Posted by Akalanka 2 comments


Are you currently in a steady relationship with bits and bytes even though your first love was wires and volts? Then building the Internet of Things be the truce that would bring them together. IoT is nothing new. The concept of connecting 'things' has been in existence for decades, since the early days of internet. After all the 'Internet' which was intended to connect machines around the world can be traced back to 1960s to the days of the ARPANET with the TCP/IP stack following a decade later in 1970s. Therefore its all safe to say that people have been connecting 'things' for longer than most of us have been alive. 

So why all the fuss now?
The 'things' which used to be mainframes spanning several floors have shrunk in size millions of times. The advancements in electronics have been tremendous in the past decades which has enabled miniaturization to a degree which would have been unimaginable during the early days of the internet. This, along with drastic reduction in costs have made it possible to put electronic gadgetry in every nook and cranny. Now you see that the 'things' we are talking about range from your seemingly innocent toaster to huge industrial process control systems. This is where the true advantage of connecting 'things' lies. Enabling communication and making them talk with each other would yield fantastic new opportunities that have never been thought possible.

This is when things start to get tricky. The 'things' we have now are no longer number crunching power hungry giants like the early days. Most of them are humble, power sipping devices conveniently tucked away from view. Connecting these 'things' are not trivial and there is a whole gamut of technical and economical hurdles to be overcome.

OK we are IoT gurus whats this narrow band thing?
Actually it is pretty pointless to sum up the different aspects of IoT and its hilariously out of context references with a simple blog post. However different options for providing means of networking for the Internet of Things are now available. Some are off the shelf like WiFi while some are too fancy and out of reach for many.. This is where Narrow band IoT comes to the scene. As its name says its intended for narrow band communication. Before you trip over, wireless transmission requires a frequency spectrum (that is a range of frequencies) and this new NB-IoT technology needs only a small range of frequencies to work (a 200kHz band to be precise), hence the term narrow band. You can also think that the narrow band loosely translates to lower data transmission rates as well (unless want to learn what good guys like Shannon & Nyquist have discovered over the years, you can keep thinking that)

What makes NB-IoT the cool kid on the block

Carrier grade connectivity

 At present, connecting devices over large areas can be only achieved using proprietary wide area networks like LoRa, SigFox or by using gateways which back haul to and from low power local/personal area networks like WiFi, BLE to other wide area networks. The former approach requires purchasing expensive gateways or living with miserable low data rates while the latter becomes a nightmare in large deployments. NB-IoT, on the other hand is completely deployed and operated by a telecom service provider - people who already look after your voice and data connections. Therefore it is safe to assume that you can get reliable carrier grade service without the headache of installing and operating the network infrastructure which by no means is an easy task. This means that now you are operating your IoT network on a GSMA standardized licensed frequency spectrum with carrier grade reliability. 

Low power consumption

NB-IoT gives a vast reduction in power consumption compared to other wide area wireless networks like GSM, WCDMA, HSPA or even LTE. This gives the opportunity to connect even low power battery operated devices with a carrier grade wireless network. Wireless modems connecting to wide area networks (GPRS, HSPA, LTE) require a substantial amount of power in comparison to the other surrounding electronics. The uneven current draw with large surges is not battery-friendly at all. NB-IoT has much less spiky current draws with shorter peaks compared to GPRS, which, combined with lower overall power consumption makes batteries last longer

Extended coverage

NB-IoT helps you to connect 'things' in places where you never thought possible. Its ability to work with low bandwidths at low data rates enables it to perform some tricks like repetitive transmission which helps to provide connectivity for devices for long distances. The specifications suggest a +20dB increase in link budget compared to GPRS. This would be specially useful in reaching underground and penetrating dense vegetation. 

Massive scale

The NB-IoT network is geared to cope with massive numbers. Specifications suggest service in excess of 50,000 devices with a single base station. Even though the stipulated numbers are achieved only subject to certain conditions, we can safely assume NB-IoT will offer much more connectivity than existing wireless networks

Low Cost

NB-IoT is designed to carry low throughput traffic intermittently. Therefore its creators designed the underlying radio layer of the network to be as simple as possible keeping in line with the basic concepts of a LTE radio bearer. The good news is that this makes NB-IoT chipsets which make up the modems which go into 'things' much cheaper than existing LTE or even GPRS chipsets. Even after less than two years of it standardization, NB-IoT modems are giving even GPRS modems a tough competition in the price department. The future is expected to be pleasant for device manufacturers in this aspect.

And so the list goes on. In a nutshell NB-IoT is a new radio network layer operating along side todays GSM, HSPA & LTE networks to provide connectivity and put the 'Thing' in the Internet of Things!

Saturday, March 17, 2018

How to build Voice Apps with Mobitel

March 17, 2018 Posted by Akalanka 2 comments


Customer engagement is a key focal point in any business. Customer relationship management can decide the fate of any company. The old school voice call is still the primary form of communication for most of our routine activities. This is why we have made it easier for your to integrate voice calling to your applications in few simple steps. Like all our services we have kept it simple and flexible so that it is a friendly tool to the novice and a versatile one for the expert.

If you are familiar with Inzpire SMS API, you will notice that the Voice API follows a similar model for connecting your application to your customer.

The voice API in Inzpire helps you build complex applications for content delivery and IVR based services with the stuff that you are already familiar with. You do not have to know any of the underlying protocols in the telco stacks such as SS7 or SigTran. You do not even have to know SIP, RTP, ICE or any of the protocols in the VOIP world. We have done all the heavy lifting for you so that just plain HTTP will make wonders in few simple steps. For all voice calls for you voice app, we will trigger a callback URL you have shared with us.After that you can call the HTTP based voice API to control the call flow (eg: answer call, hangup call, play voice prompt, get DTMF response from customer etc.)


As in any voice application you will have to have a short code(eg: 243) or long number (eg: 0712755777) for your customer to dial your service. Unlike in SMS API, this number is not shared between applications as it would make the user experience more troublesome. Therefore you need to obtain a short code or long number to use the voice API.

Step 1: Obtain a short code or long number
  • Short code- Using a short code for your service would be great if you are building an app for content delivery over voice (eg: an e-book portal). If you want a short code for your service you will have to contact us to check the feasibility and availability of the short code you like. 
    • Send an email to inzpire@mobitel.lk with your preferred short code and we will get back to you within 2 business days.
    • Only Mobitel customers will be able to dial your voice app
    • You can discuss with us to set custom charging for the short code for Mobitel customer. Please note this per minute charge might be subject to TRC regulations. A majority portion of the collected revenue for the short code will be settled to you where the exact revenue share percentage will be finalized upon approval by Mobitel
    • A rental will be applicable for the short code
  • Long number- This method is useful if you are building an IVR for your customers and you want both Mobitel and non Mobitel customers to reach you. All you have to do is get a Mobitel SIM with a long number with any prepaid or postpaid connection. You can obtain any number that is available currently.
    • Get a Mobitel number
    • Set all calls forwarding for that SIM to 0710303010
      • You can set call forwarding using the call settings menu in your phone or
      • Dial *21*0710303010# to activate
      • If you want to cancel the call forwarding, dial #21# or disable call forwarding in your phone's settings menu.
    • Once the call forwarding is done you can keep or remove the SIM card from the phone as you wish
    • There will be no rental or revenue share for this number for using the Voice API
    • You will not receive any revenue from this number as only standard call charges will be charged to the customer who dial this number.
    • You will be charged the call forwarding fee for all the calls that are received by this number.


Step 2: Create voice app service for callback URL
  
You should have a HTTP web server running at a public location for the Inzpire voice API to handle voice calls. Once a call is received by your short code or long number an HTTP request will be made from the Inzpire voice server to this server. The URL of this service should be entered in the callback URL in the next step when provisioning a voice application. The request will be a HTTP POST with the following parameters.

  • callerid: This is the mobile number if the customer who originated the call
  • txid: This is a unique transaction ID for this call. The transaction ID will be needed for handling the voice call via the API as you will see in the following steps.
  • ivrno: This is the short/long number of your voice application to which this call was received by.
Step 3: Provision your voice application

  • Login to the Inzpire developer portal at https://developer.mobitel.lk/selfcare
  • Click Voice > Home in the left nav bar. You will be redirected to the voice portal at https://mvoice.mobitel.lk
  • Click on 'Create App' and enter
    • IVR number - This is the short code/long number which your service will be available on
    • App URL - This is the callback URL you setup in the previous step
  • Once created, your app will show up on the 'My Apps' page
  • You will receive a OTP code to your phone as an SMS
  • Enter the OTP and click verify to complete the app registration
  • Click on the 'Profile' button on the voice app to upload audio files if needed as shown below. Your audio files should be in .wav format. We will see how you can play these voice prompts to the calling customers via the API in the next steps.

  • Received calls will show up in the 'Call log report' tab of your voice portal
Once this step is complete, you should be able to receive a call back request to your application server when a call is dialled to your voice app number. eg: If you chose 243 as the short code, dial 243 with any Mobitel number and your service should receive a HTTP POST with the relevant parameters. To do any real testing you should familiarize yourself with the API which we will do in the following step.

Step 4: Calling the Voice API in Inzpire

In order to call the voice API you have to create an application key in the Inzpire API portal

  • Step 4.1: Navigate to Inzpire API portal at https://developer.mobitel.lk/mobext/mapi/product and login with the same credentials you used in the developer self care portal
  • Step 4.2: To consume APIs via the API manager you need to create an application key. Click on 'Apps' link on the API portal and click on 'Create new App' on the top. Fill the following details to create the application
  • Title - name of your application
  • Description- brief description on what your app will do
  • OAuth Redirect URI - The redirect URI used in oAuth flow if your application uses oAuth based authorization in any of the APIs.

  • You can view your newly created app under 'Apps' and click on the app name to view further details. Note the ClientID in the and click the 'show' checkbox to view the ClientID. You will need this in consuming the API
  • Go to the API product page here and select the mVoice API
  • Click on the 'Subscribe' button and select the the application that you just created on the menu that pops up. Now your app is subscribed to the voice API
The mVoice API in Inzpire has the following services available:
  • Play file- This service can be called to play an audio file that was uploaded in Step 3 to the calling party. The HTTP request will return only when the file playback is finished eg: play a welcome message
  • Play file async- This service can be called to play an audio file that is already uploaded. But unlike the previous service, the HTTP request terminates immediately and does not wait for the file playback to finish. Once the playback is finished a custom callback URL is triggered to prompt the developer application for the next action. This method can be used if the audio file is very long.
  • Play and wait for input - You can call this service to play an audio file and wait for the user to enter a number (DTMF tone) as a response. eg: Play a file to select 1 for Tech support, 2 for marketing and 3 for sales. You will receive the number that the customer entered as the response to this API call.
  • Play and wait for input async- Similar to the previous API call, but the request terminates immediately and the user input is sent as a callback to the custom callback URL. Like to the Play file async method, this method is suitable for playing back long audio files.
  • Say number- This service is useful if you want to read out a number to the calling customer. eg: 1234 is read out as one thousand two hundred and thirty four. You can set the language as Sinhala , English or Tamil. This will be useful if you want to read out your customer's account balance or anything similar
  • Say Digits- This service is useful if you want to read out a number in digits to the calling customer. eg: 1234 is read out as one, two, three, four. You can set the language as Sinhala , English or Tamil
  • Hangup- This service can be called to terminate the call
  • Hello world - This is a demo service which play a default 'Hello world' prompt to the caller
4.1 API definition - Play file
  • URL: 
    • API Endpointhttps://apphub.mobitel.lk/mobext/mapi/mvoice/playfile
  • Request type:
    • HTTP POST
  • Headers:
    • x-ibm-client-id : The application's client ID
  • Body: The body should be a JSON formatted string with the following parameters
    • filename: The name of the file that you uploaded in Step 3 to the portal
    • txdata
      • txid: The transaction ID of the voice call received by the callback URL when the call was initially received
      • ivrno: the short code/long number of this voice app
      • callerid: The mobile number of the customer who originated this call. You will find this parameter in the initial callback when call is received.
4.2 API definition - Play file async
  • URL: 
    • API Endpointhttps://apphub.mobitel.lk/mobext/mapi/mvoice/playfileasync
  • Request type:
    • HTTP POST
  • Headers:
    • x-ibm-client-id : The application's client ID
  • Body: The body should be a JSON formatted string with the following parameters
    • filename: The name of the file that you uploaded in Step 3 to the portal
    • txdata
      • txid: The transaction ID of the voice call received by the callback URL when the call was initially received
      • ivrno: the short code/long number of this voice app
      • callerid: The mobile number of the customer who originated this call. You will find this parameter in the initial callback when call is received.
    • callbackurl: This is the custom URL to which you will receive a callback when the file playback is complete
4.3 API definition - Play file and wait for input
  • URL: 
    • API Endpointhttps://apphub.mobitel.lk/mobext/mapi/mvoice/playandwaitforinput
  • Request type:
    • HTTP POST
  • Headers:
    • x-ibm-client-id : The application's client ID
  • Body: The body should be a JSON formatted string with the following parameters
    • filename: The name of the file that you uploaded in Step 3 to the portal
    • txdata
      • txid: The transaction ID of the voice call received by the callback URL when the call was initially received
      • ivrno: the short code/long number of this voice app
      • callerid: The mobile number of the customer who originated this call. You will find this parameter in the initial callback when call is received.
    • timeout: The maximum time this method will wait for the customer to enter a digit
    • numdigits: The number of digits the customer is expected to enter
4.5 API definition - Say number
  • URL: 
    • API Endpointhttps://apphub.mobitel.lk/mobext/mapi/mvoice/saynumber
  • Request type:
    • HTTP POST
  • Headers:
    • x-ibm-client-id : The application's client ID
  • Body: The body should be a JSON formatted string with the following parameters
    • number: The number that you want to readout
    • txdata
      • txid: The transaction ID of the voice call received by the callback URL when the call was initially received
      • ivrno: the short code/long number of this voice app
      • callerid: The mobile number of the customer who originated this call. You will find this parameter in the initial callback when call is received.
    • language:
      • en 
      • sin
      • tam
4.6 API definition - Say Digits
  • URL: 
    • API Endpointhttps://apphub.mobitel.lk/mobext/mapi/mvoice/saydigits
  • Request type:
    • HTTP POST
  • Headers:
    • x-ibm-client-id : The application's client ID
  • Body: The body should be a JSON formatted string with the following parameters
    • number: The digits that you want to readout
    • txdata
      • txid: The transaction ID of the voice call received by the callback URL when the call was initially received
      • ivrno: the short code/long number of this voice app
      • callerid: The mobile number of the customer who originated this call. You will find this parameter in the initial callback when call is received.
    • language:
      • en 
      • sin
      • tam
4.7 API definition - Hangup
  • URL: 
    • API Endpointhttps://apphub.mobitel.lk/mobext/mapi/mvoice/hangupcall
  • Request type:
    • HTTP POST
  • Headers:
    • x-ibm-client-id : The application's client ID
  • Body: The body should be a JSON formatted string with the following parameters
    • txid: The transaction ID of the voice call received by the callback URL when the call was initially received
    • ivrno: the short code/long number of this voice app
    • callerid: The mobile number of the customer who originated this call. You will find this parameter in the initial callback when call is received.
4.7 API definition - Hello world
  • URL: 
    • API Endpointhttps://apphub.mobitel.lk/mobext/mapi/mvoice/helloworld
  • Request type:
    • HTTP POST
  • Headers:
    • x-ibm-client-id : The application's client ID
  • Body: The body should be a JSON formatted string with the following parameters
    • txid: The transaction ID of the voice call received by the callback URL when the call was initially received
    • ivrno: the short code/long number of this voice app
    • callerid: The mobile number of the customer who originated this call. You will find this parameter in the initial callback when call is received.

You are now ready to build voice apps with Inzpire!. Visit the API portal here to play with the voice API.